About This Design
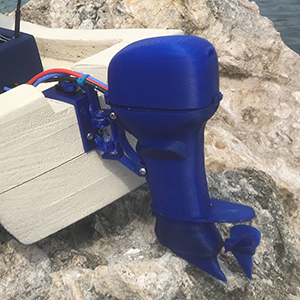
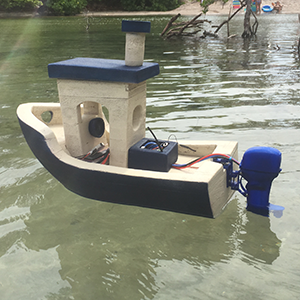
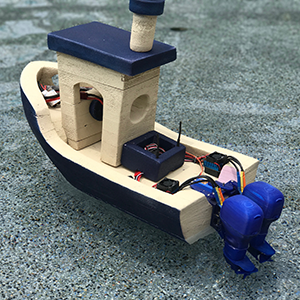
The Open Source Outboard is a 3d printable outboard motor for rc watercraft. It is an original design that was developed as part of a larger effort of making an radio controlled fishing boat, a lofty goal. If you are going to shoot into the sky, at least aim for a star. That’s what mama always said.
Open Source:
This is being released open-source with ulterior motives. I’m hoping that people will print this and provide input on how it can be improved, and how I can improve my future designs. This is new ground for me so I’m just parotting what I see other people do :P
Disclaimer:
This is an adult toy and it should be used with caution. It has a blade that can spin very fast, held together with plastic threads extruded by your printer. I don’t trust my printer to make a shelf bracket that would hang above my head. So I do not EVER run this out of the water. One has not jettisoned yet, but it is a demonstrated possibility. PLEASE BE SAFE!
Current State: Version 1.0
This is a proof of concept that performs very well in my opinion. RCBenchy is a bad design choice for speed testing, I was lucky that it stayed upright. Extensive testing and tuning is the next order of business. The RCBenchy running the dual motors in the video was using 3650 3750kv sensorless brushless motors and a 3s lipo. I could reach 1/4-1/3 throttle before it became too dangerous for the poor benchy. These are the issues that need attention.
- Motor/Power Both motors(2845, 3650) go into protection mode if given to much throttle. 2s or 3s, within spec and outside of spec had the same effect. I'm hoping an rc hero comes along and recommends a better configuration. Maybe configuring the esc is the fix, I haven't done that yet.
-
Cavitation: SS MakeShift running the dual motor system would reach 1/2 throttle and start cavitating. I have theories to try, but they are only based on what I assume is happening.
- Enlarge anti-ventilation plate [easy fix if it works]
- Extend midsection more - to put prop deeper. [not a good fix - adds printing time]
- Decrease prop pitch - [really grasping here]
-
Improve Profile: Drag should be reduced, at high speeds the water could channel around the profile better. I left room in the design for these adjustments. Clock doesn’t have enough time however.
- Create a skinny midsection, use clay or something similar to overbuild and find a profile that works.
-
Test cooling system: I overdid one run and it caused the water cooler to deform (without coolant running).
- Create a test rig to get reliable data on the performance of the cooler. I think it will work, but I’m not willing to bet anyone.
- Look harder for a motor that doesn’t require cooling, or uses air cooling instead. The cowling would look pretty sweet with a fan on it.
- If the cooler does not work, find an aftermarket motor cooler and integrate it into the design.
-
Replace bearings: Their maintenance is the worst part of this design.
- I’m experimenting with 3d printable silicon nitride bearings. Initial tests are promising. However it requires a smaller nozzle diameter (.25mm) to achieve the tolerances required. So I’m not recommending it in this build.
- Create housings for components: things will get wet. We can protect them with plastic.
Videos
- Open Source Outboard - Version 1 - Testing
- Open Source Outboard - Version 1 - Design Review
- Open Source Outboard - Version 1 - Build Log
- Single Motor Steering System - Version ALPHA - Build Log
- Dual Motor Steering System - Version ALPHA - Build Log
BOM
I'm linking to Amazon because it is fast and convenient. There are better prices to be found. I'm also linking to Accugroup because I like their selection and the hardware has been great quality. I live in the states and they are in the uk, but its worth the wait in my opinion. I only use stainless/torx type because dealing with a stripped screw in plastic is frustrating to put it politely.
-
Open Source Outboard
-
Required RC Electronics: the type is optional, these are my choices.
- Transmitter/Receiver
- ESC (usually bought with motor)
- 3s Lipo Battery or 2s Lipo Battery
- Sensorless Brushless Motor: (Supported Sizes [ 2845, 3650 (no water cooler) ])
- 4mm stainless steel rods
- Stainless Steel Fasteners:
- (3) 4mm ID Flanged Bearings
- (1) 3.17mm to 4mm Shaft Coupler Much less expensive internationally
- (1) Water Pump
-
Required RC Electronics: the type is optional, these are my choices.
-
Single Motor Steering System
- Micro Servo
- (2) 3mm ID flanged bearings
- Stainless Steel Fasteners:
-
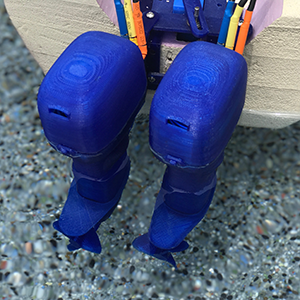
Dual Motor Steering System
- Waterproof Servo (TODO: locate less expensive servo with same dimensions)
- (7) 3mm ID flanged bearings
- Stainless Steel Fasteners:
Print Settings
Needs to be printed with a filament that has little shrinkage. I use PET-G, ABS is an option. PLA may not work, I haven't tried it however. These settings are required, because the design has dimensions that are multiples of that line width. This means all the parts can be printed at the same time. It also means, that if you find your hardware does not fit well (screws should slide through with little resistance, nuts should drop in nut traps but hold when being threaded) you can adjust the scale of the entire assembly. All the parts will fit together still and the hardware hole should change. This could affect the way the slicer plans the print, so check the layers for gaps before printing. Gaps in the walls is bad.
- .4mm nozzle
- .4mm line width
- .4mm wall thickness
- 100% infill
- No supports
- .2mm layer height or better
Update Log
-
Open Source Outboard
- 09/4/2017 - changed from carbon fiber rod to stainless steel rod. Carbon fiber was not strong enough
- 06/14/2017 - v1 released
- 06/21/2017 - Webpage released
-
Single Motor Steering System
- 06/14/2017 - alpha version released
-
Dual Motor Steering System
- 06/14/2017 - alpha version released
File Name Formatting
I use shorthand to label the design files, formatted with a structure of
[build_name]-[major_version]-[part_name]-[(optional)distinctions]-[(optional)minor_version]. (e.g. osobv1-motor_cooler_mount-3650-2 - which translates to
open source outboard version 1 - motor cooler mount - (for) 3650 - part version 2).
There are not many parts here, but they are subject to change. This naming structure will help keep the files organized.
To select the correct design files.
- locate the design you want to start (osob = Open Source Outboard, smss = Single Motor Steering System, dmss = Dual Motor Steering System)
- use the update log to determine which version is right for your setup
- find any distinctions (aka variations/remixes) that match your specific motor/esc/servo
- if there are minor versions, look at the section in the update log that matches that design file
- determine which minor version works for you - usually it is the most recent
- don't see the right one for you? request a variation. or better yet, make a variation :)